Setting up Account Map Linking
The Account Map Linking feature enables you to connect Miro account maps directly to Salesforce Accounts, viewable natively within the Salesforce platform.
Open the app from the side panel.
Click on the Account Map tab and click Continue.
You will be requested to perform the following in your Salesforce instance:
Create a custom field named MiroAccountMap under the Account object
Add Visualforce code
Edit account page layout
The section below provides a detailed guide on linking and configuring the Account Map Linking feature between Salesforce and Miro.
Creating an Account Map custom field in Salesforce
Log in to your Salesforce account.
Click Object Manager > Account > Fields & Relationships.
Click on the New button and select the URL radio button. Click Next to proceed.
Enter the following in the required fields:
Field Label: Input “MiroAccountMap”
Field Name: Input “MiroAccountMap”
You can fill in the “Description”, this is optional. Click Next to proceed.
Confirm the default field-level security. Click Next to proceed.
Select the page layout names based on your requirements. Click Save to complete.
Adding Visualforce code
Click the gear icon (⚙) on the navigation bar and select Setup.
In the Quick Find search bar, search for “Visualforce Pages”. Click on Visualforce Pages.
Click New and enter the following in the required fields:
 The information below is a suggestion only. Name the fields with your desired choice.
Label: sfm_account_map
Name: sfm_account_map
Check the “Available for Lightning Experience, Experience Builder sites, and the mobile app” checkbox.
If this option is not checked, the Visualforce page created cannot be added as a component during the page layout edit.
In the Visualforce Markup tab, paste the following code:
In the second line of the code, “{!account.MiroAccountMap__c}” refers to the field name created in step 4 of Creating an account map custom field in Salesforce.
<apex:page standardController="Account" readOnly="true">
    <apex:iframe src="{!account.MiroAccountMap__c}" scrolling="false" id="miroembed"/>
    <script>document.getElementById('miroembed').height = window.innerHeight - 30;</script>
</apex:page>
Click Save to complete the configuration.
Enable Visualforce Pages for user profiles that currently don’t have access. For more information, refer to the documentation: Salesforce | Make Visualforce Pages Visible to Users.
Editing account page layout
Click on the App Launcher > search and click Sales.
In the Sales top navigation bar, click on the Accounts tab.
Search for an account using the “Search this list…” search bar. Click on an account of your choice.
Next, click the gear icon (⚙) on the navigation bar and select Edit Page.
Perform the following steps:

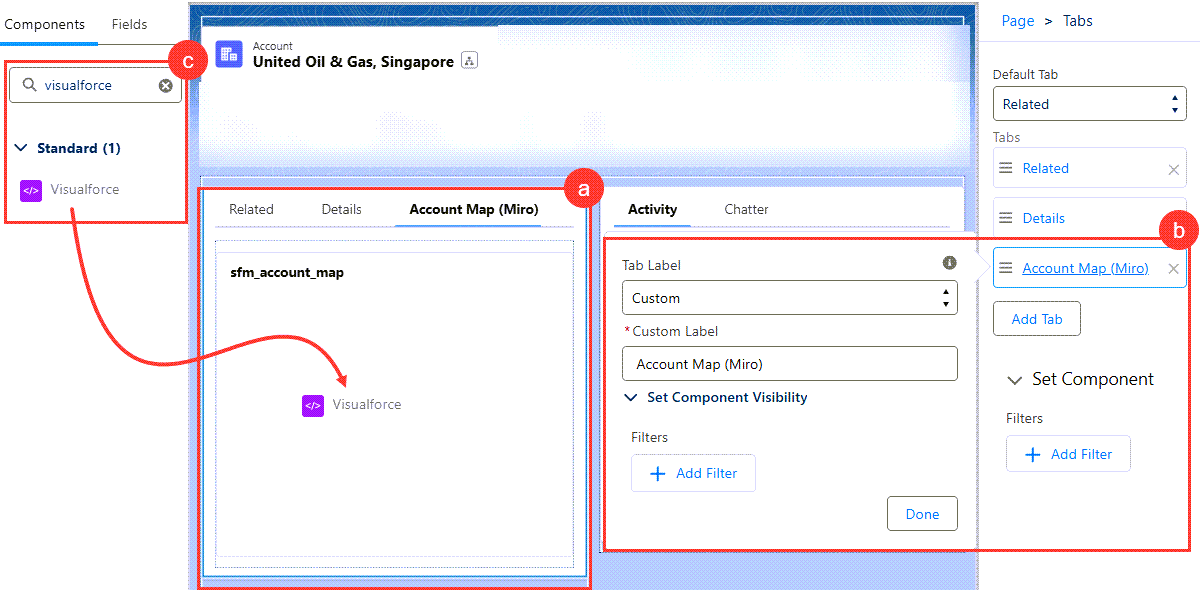
Click on the middle section.
On the Tabs modal, click Add Tab. Next, in the Tab Label dropdown, choose Custom. Name the tab in the Custom Label field and click Done to complete the tab creation.
The tab will now appear in the middle section. In this example, the tab is named “Account Map (Miro).”In the Components tab panel, search for “Visualforce” and drag the result to the middle section.
Click Save at the top right of the page and Back at the top left. You will return to the Accounts page. The newly created tab with the VisualForce component should be visible now.
If the tab is not visible in the Account page layout, you may have to activate the page. Refer to this guide: Activate Your Lightning App Page.
Return to the Salesforce for Miro app. Click Refresh and the screen will change to the Account Map interface.
Congratulations! The main setup is complete, you can now start using Account Map Linking. To learn how to do that, check out our user guide here:
